
Getting Started with 504
Import Student
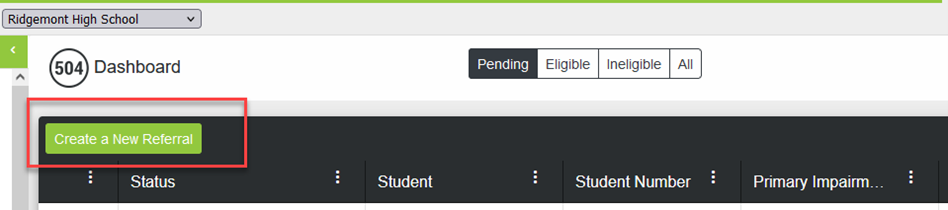
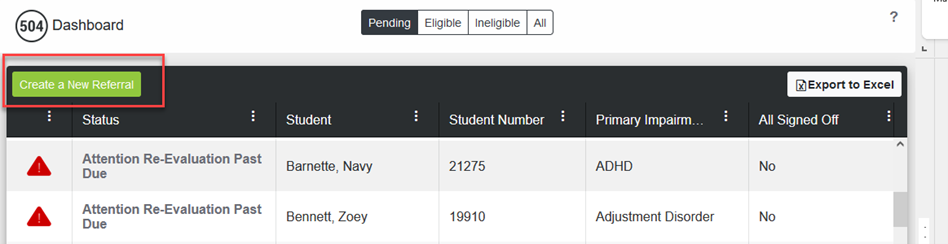
You can import a student who is already 504 eligible into the 504 Module by clicking on the 504 Dashboard outline link in your Campus Tools. Click the "Create New Referral" button to add the student to the 504 Dashboard.
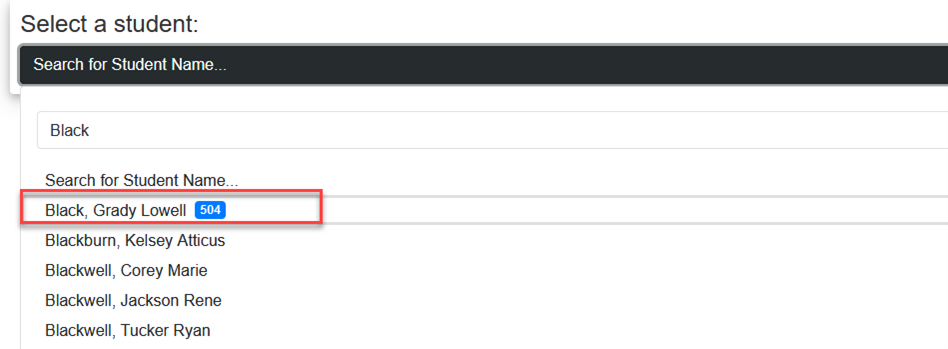
Select the student from the drop list by scrolling to find the student name or by typing the student's name in the search for student name field.
The students who can be imported will have the blue 504 icon next to his/her name.
Note: This blue 504 icon is controlled by the flag on a student that is selected in your 504 Settings.
After selecting the desired student, the import options will load automatically.
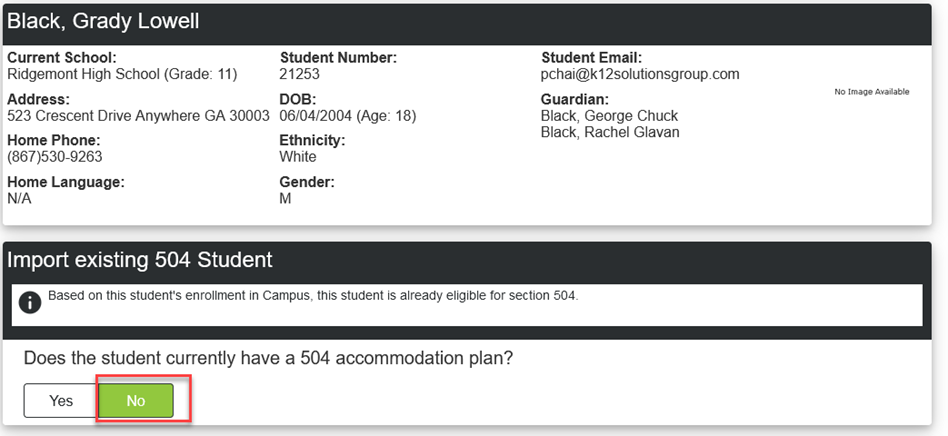
The first question wants to know if the student has an existing 504 accommodation plan. For those students that are 504 Eligible, but do not have an accommodation plan, answer ‘No’.
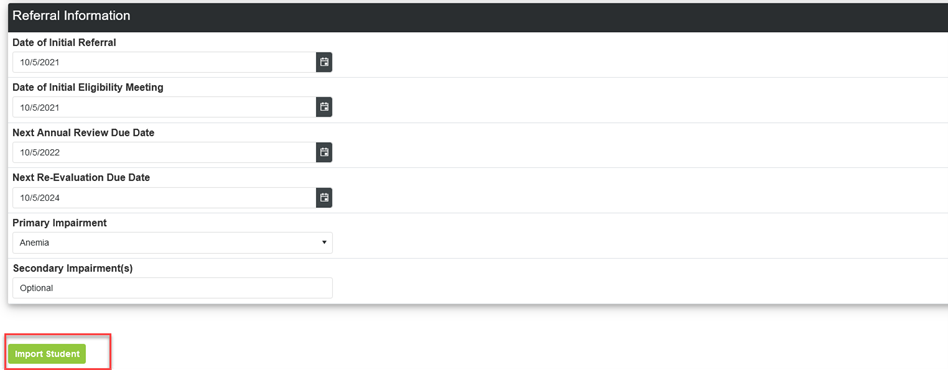
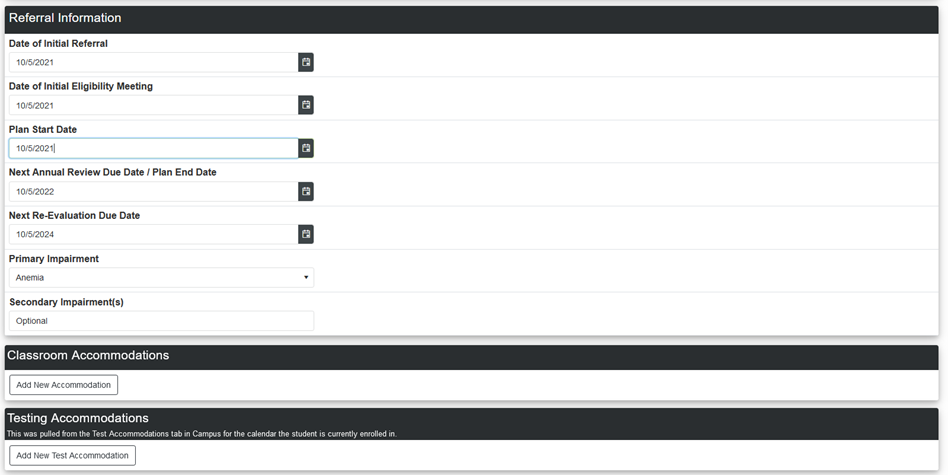
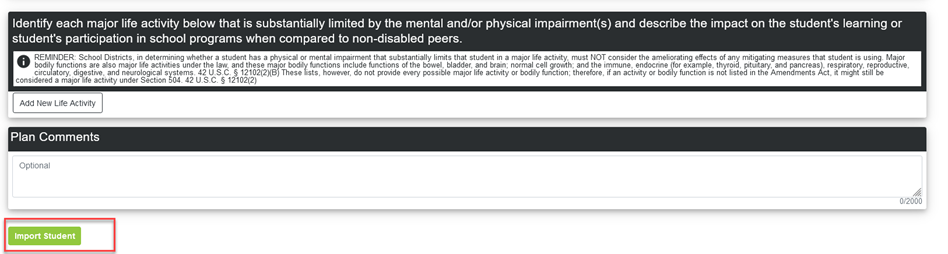
You are presented with four (4) dates, the student’s Primary impairment and any Secondary impairments, and a place to enter any major life activities (major life activities are not a required field before importing).
Click the ‘Import’ button to complete the import process.
This will place the student on the 504 Dashboard under the Eligible tab with a status of ‘Eligible-No Plan (Import)’.
Note: The advantage of adding 504 eligible students with no plan to the dashboard is that the module will move the student to the Pending tab when one of the dates you entered for
Next Annual Review Due Date or Next Re-Evaluation Due Date becomes due. This helps in reminding you that this student needs a review.
For those students that are 504 Eligible with an accommodation plan answer ‘Yes’.

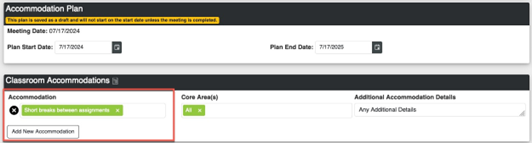
You are presented with five (5) dates, a place to enter the Primary impairment as well as any Secondary impairments, and can now build the plan by selecting the student’s current Classroom Accommodations and current Testing Accommodations.
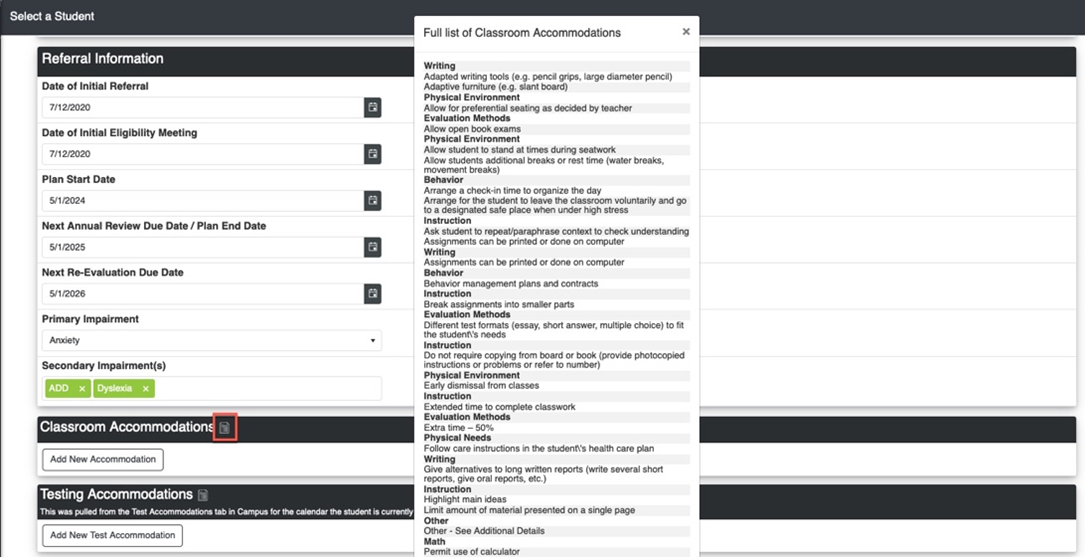
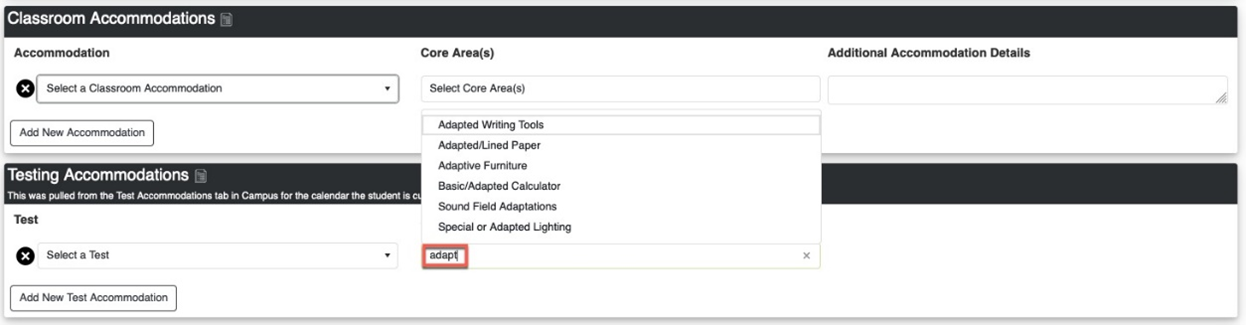
A complete list of Classroom Accommodations can be seen by clicking on the  icon (highlighted in red below).
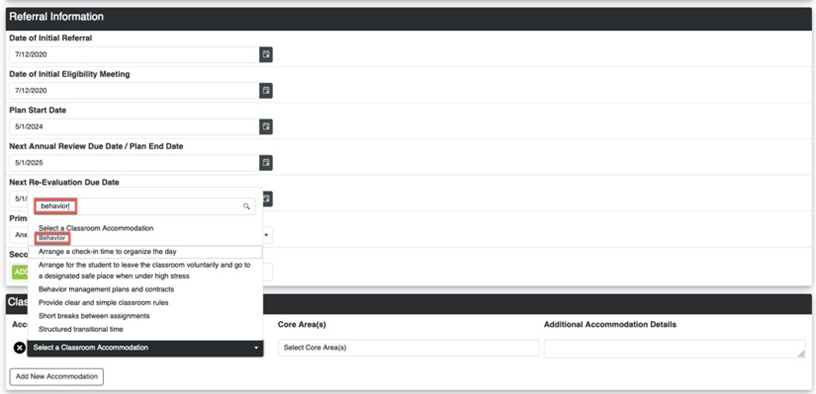
Classroom Accommodations can be filtered in the dropdown by typing a word included in the accommodation or by typing Accommodation Type. For example, if ‘behavior’ is typed in the search, then all accommodations under ‘Behavior’ will appear in the drop list. Next, a content area will be selected and any Additional Accommodation Details can be included to ensure a teacher properly provides each defined accommodation.
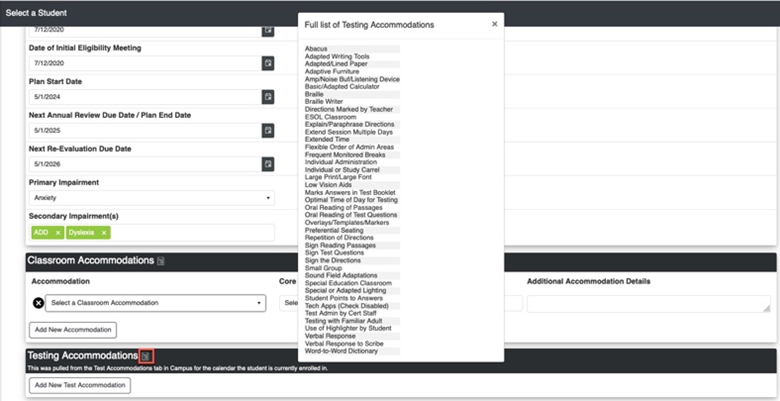
A complete list of Testing Accommodations can be seen by clicking on the icon (highlighted in red below).
Additional accommodations may be added by clicking on the Add New Accommodation button.
To add a Testing Accommodation, click in the box and select from the custom list of tests and then select from the list of custom accommodations.
Accommodations can be filtered by starting to type a word in the search box that is included in the accommodation. Multiple accommodations may be
selected per test. Any comments related to the test accommodation(s) can be added in the Comments box. Use the Add New Test Accommodation button
to add additional tests and accommodations.
Next enter his/her major life activity and any plan comments. Then click Import Student.
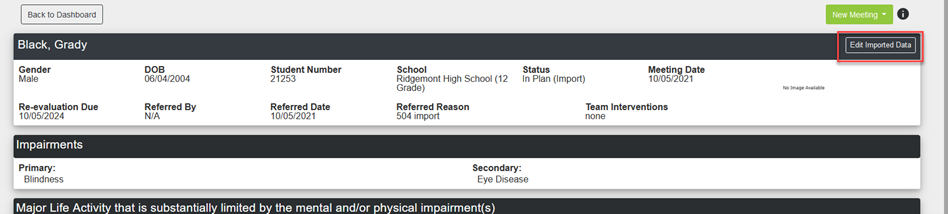
The student will appear on the 504 Dashboard under the Eligible tab with a status of In Plan (Import).

This student is now ready to schedule his/her first meeting using the 504 Module. If data entered on the import needs to be modified, click on the student's status and then select Edit Imported Data.
Note: This option is only available prior to the first meeting being scheduled in the 504 Module. Once a meeting has been scheduled the ability to edit imported data will no longer be available.
Referral
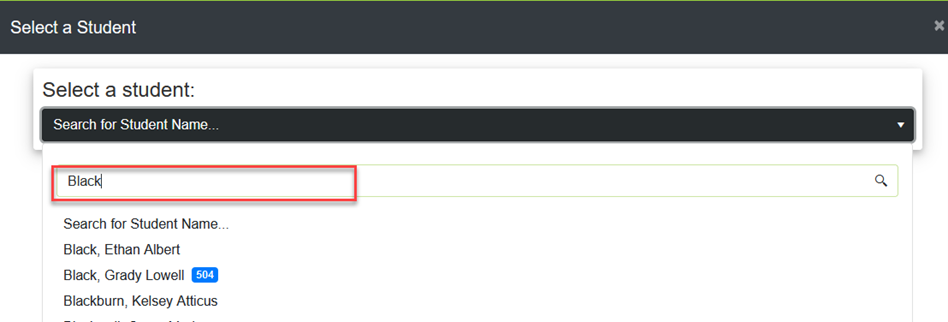
You can add a student to the 504 program by clicking on the 504 Dashboard outline link in your Campus Tools. Click the "Create a New Referral" button to add the student to the 504 Dashboard. You must be locked into a calendar to see the “Create a New Referral” button.
Note: You must have a school selected to create a new referral.
Select the student from the drop list by scrolling to find the student name or by typing the student's name in the search for student name field.
NOTE: If the student has a 504 icon next to his/her name, the student has already been found as 504 eligible with a flag in Campus. Selecting this student will allow you to import data. See the Add Imported Students section for additional information.
After selecting the desired student (with no blue 504 icon), referral options will load automatically.
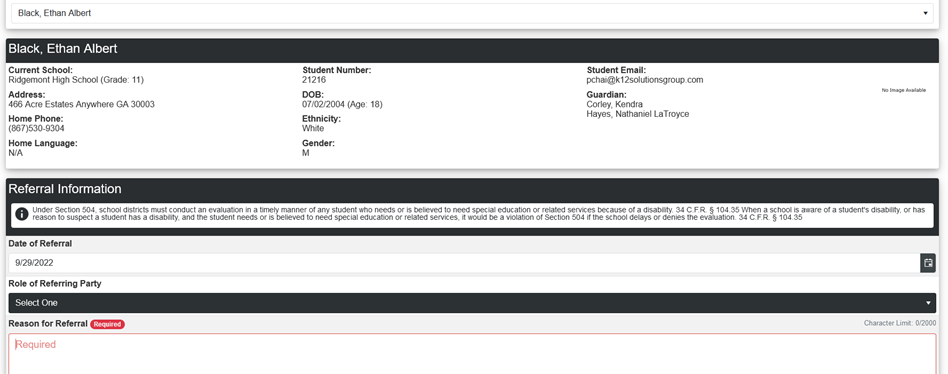
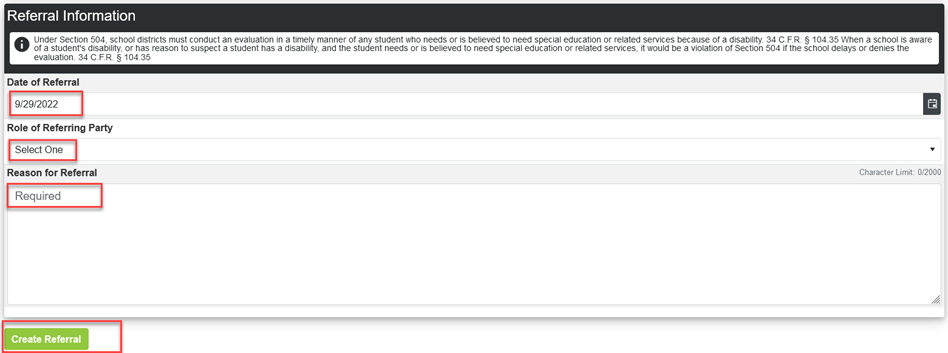
The Date of the Referral will default to today's date. Click on the date icon to change date as needed. Select the role of the referring party, along with all options that appear for that selected role.
Note: The 504 Administrator checkbox must be checked on District Assignment record to appear in Administrator drop list.
Drop list for Counselor and Teacher also requires Counselor or Teacher checkbox on District Assignment record.
Enter the Reason for the Referral. Then click the Create Referral button.
The student will be added to the 504 Dashboard (Pending) with a status of Referred. Click on the status in order to navigate to the next steps.

Permission to Evaluate from Parent
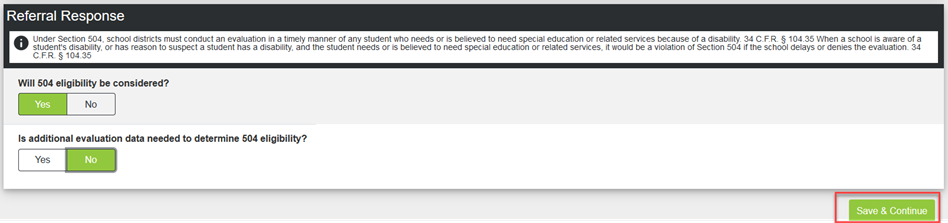
504 allows staff to send electronic documents to parents/guardians via email. To begin this process, select if eligibility will be considered. ‘Yes’ will allow you to continue. ‘No’ will require you to describe the reason or this decision, the status will be changed to DENIED and the process will end. If ‘Yes’, you will be asked if additional evaluation data is needed to determine 504 eligibility. If no additional data is needed, select ‘No’ and click 'Save & Continue'.
If additional evaluation data is needed, select ‘Yes’. If Parent/Guardian was the referring party, permission to evaluate is implied. You are then presented with a question of whether the Parent/Guardian needs to receive permission to evaluate forms. If ‘No’ is selected, the referral date is populated as the date permission was received and the guardian that was the referring party is populated as the guardian giving permission. Click Save & Continue if the information is correct.
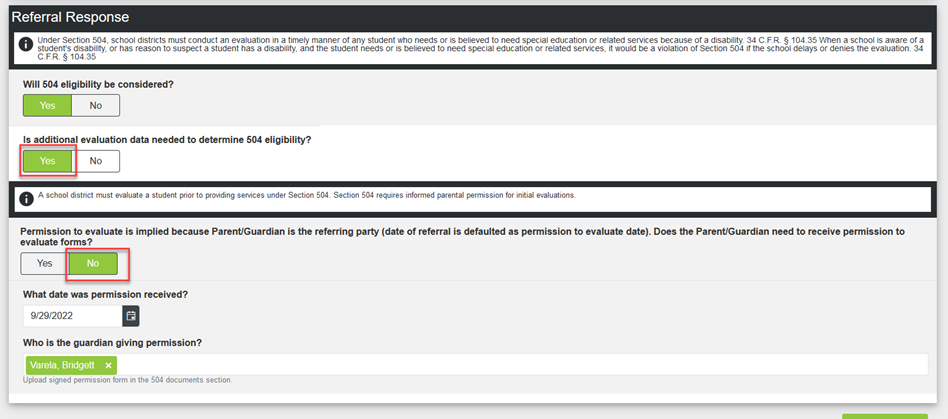
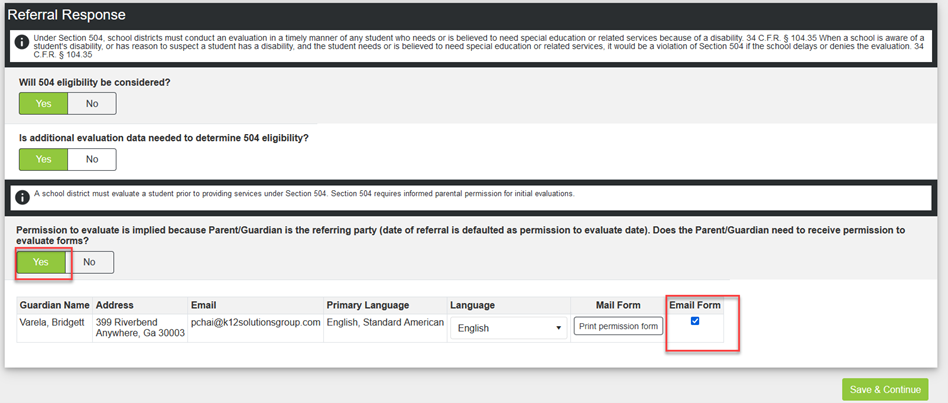
If Parent/Guardian does need to receive permission to evaluate forms, select ‘Yes’ and you will be presented with a way to email form to parent for electronic permission/signature. Click Save & Continue to email the form.
If additional evaluation data is needed and Referring party was NOT the Parent/Guardian, you are asked if a signed permission to evaluate was received. If you answer ‘Yes’, you must enter the date received and guardian giving permission.
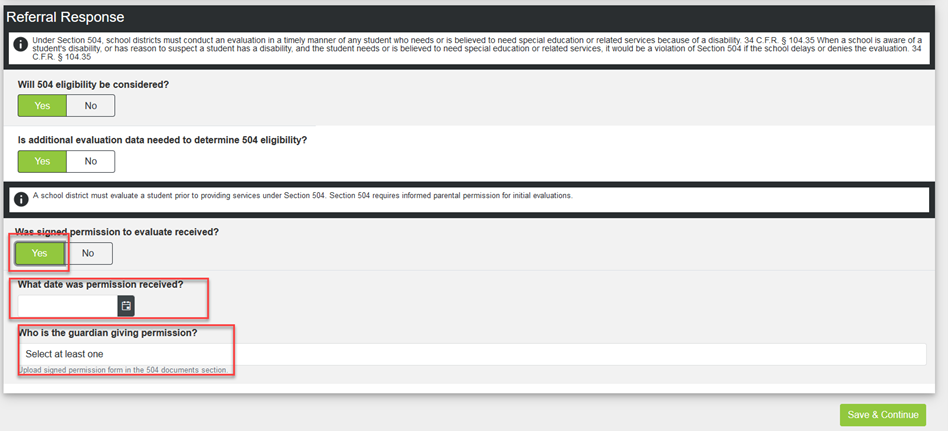
If you answer ‘No’ you will be presented with a way to email form to parent for electronic permission/signature. Click Save & Continue to email the form.
Note: All forms may be sent via email by selecting Print form and mail. The email address must be listed in Campus to send via email. If no email exists, document must be printed and mailed.
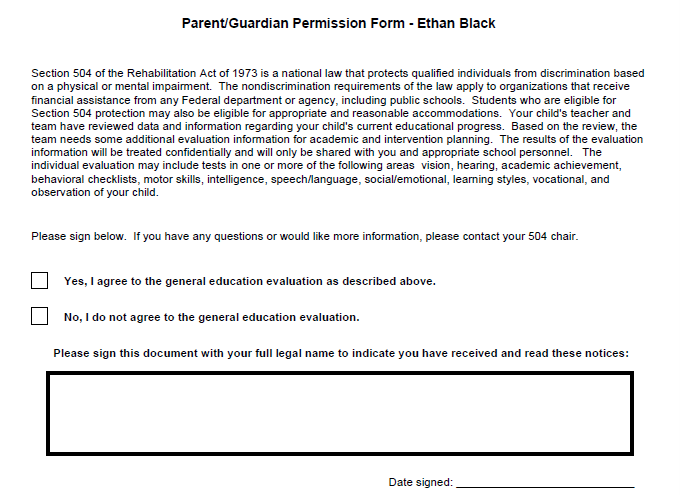
To print permission form, click 'Print Permission Form' button. The PDF document will download.
Sample of Permission Form. 504 Settings allows districts to customize verbiage on this form.
Once a permission form has been sent, the student's status will change to "Pending Permission" on the 504 Dashboard. The Permission Status will show as Waiting for Permission until the guardian has filled out and signed the document. If the guardian does not sign the document within 2 weeks, the Permission Status will change to ‘Expired’.
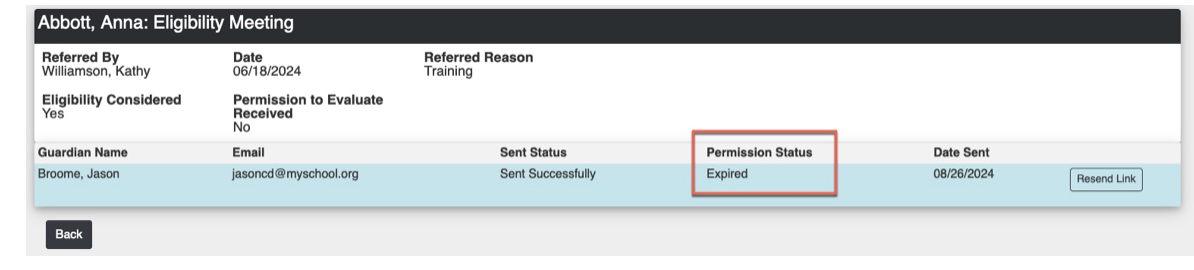
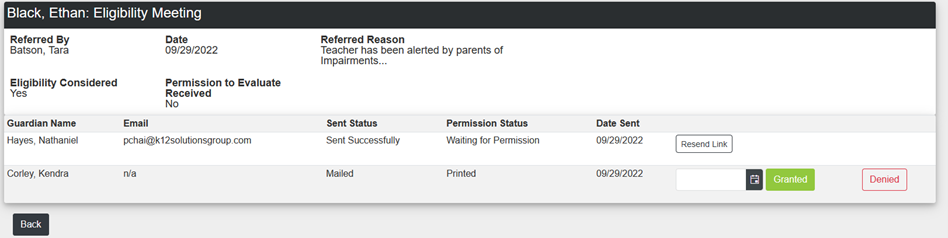
The Permission to Evaluate form will need to be sent again by clicking the ‘Resend Link’ button. If the guardian selects ‘No, I do not agree to the general education evaluation’, then the student will have a status of ‘Denied’ on the 504 Dashboard and a Permission Status of ‘Permission Denied’. This will remain the same until a Permission to Evaluate form is sent again and the guardian answers ‘Yes’.

If the guardian answers ‘Yes’, the student’s status will change to ‘Pending Meeting’ on the 504 Dashboard. If the document was mailed, you may indicate if the guardian granted or denied permission within the application. Enter the Data and click Denied or Granted.
Create Eligibility Meeting
Once permission is granted, the next step is to setup an eligibility meeting for the student.
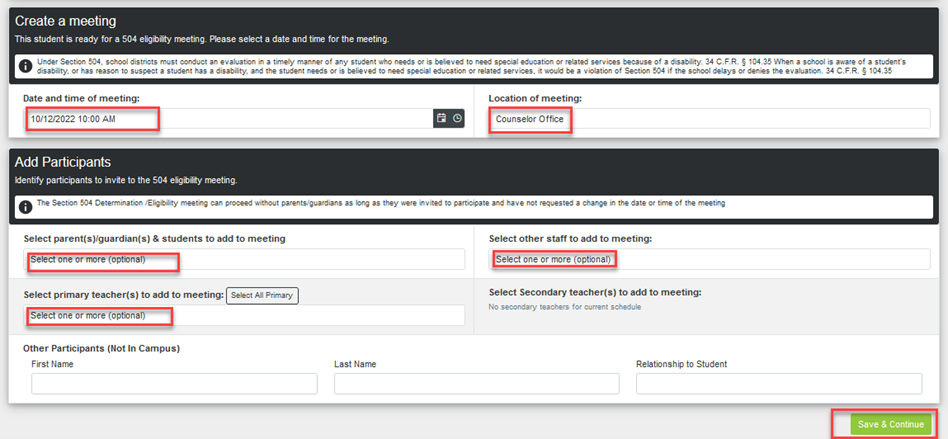
Clicking on “Pending Meeting” will take you to the "Create A Meeting" page.
From here, you add a meeting time, meeting location, and invitation list. The Add Participants page is separated into five (5) sections.
Each section allows you to click into the ‘Select one or more (optional’ box and select as many participants as needed.
Primary and Secondary teacher sections also provide a ‘Select All’ box to quickly pull in all currently rostered teachers.
The Other Participants-Not in Campus provides a way to document a manual invitation for a person such as a translator, lawyer, or advocate.
This person will not receive any communications, but can be selected as a participant once the meeting is started and may sign electronically if physically present at the meeting.
“Save & Continue” to schedule the meeting.
NOTE: You can return to this page to add more participants at a later time.
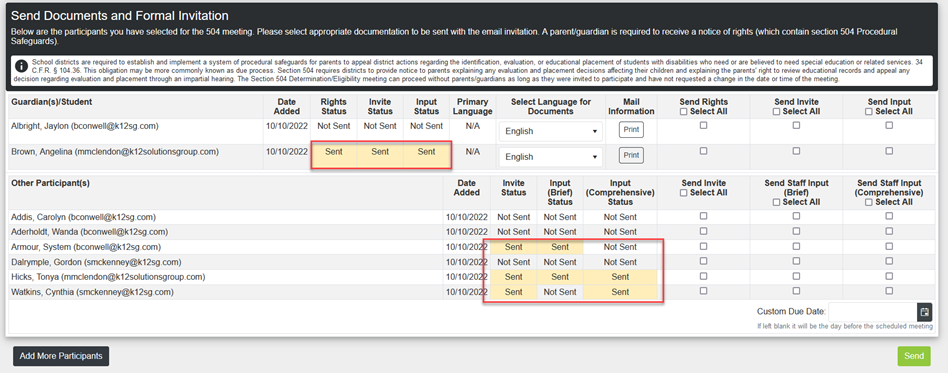
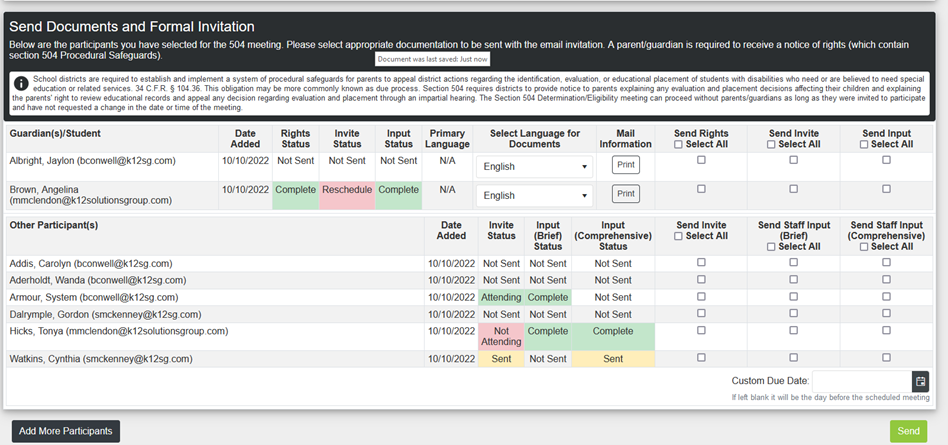
Once the meeting is scheduled with the selected participants you have the option to send the documents via email or printed copy for Guardian and/or Student Participants. The email address for the participant will be listed next to the participant's name. If the email address is not listed, documents will need to be mailed. Under the Participants list select the Language. Then select Print if documents should be mailed (this will download the documents in PDF format). If the participant's email is available, check the box(es) to Send Documents electronically.
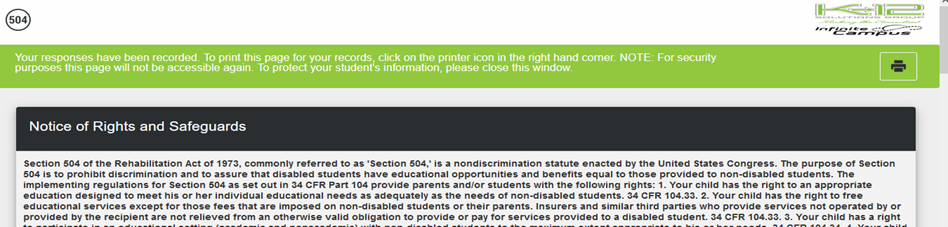
- Rights – Includes Rights and Safeguards
- Invite – Invitation to the meeting: lists date, time, location, and meeting invitees
- Input – Input form for parent/guardian
- Invite – Invitation to the meeting: list student name, date, time and location
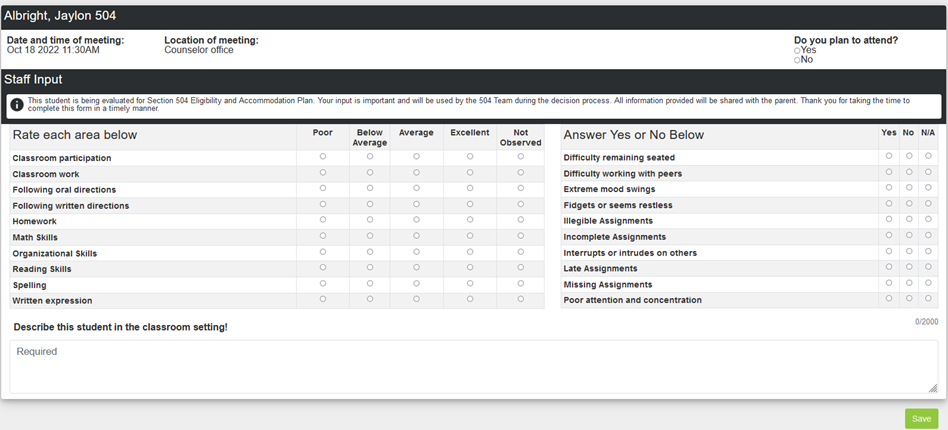
- Staff Input (Brief) – Input form with both Scale score and Yes/No questions
- Staff Input (Comprehensive) – Open response question
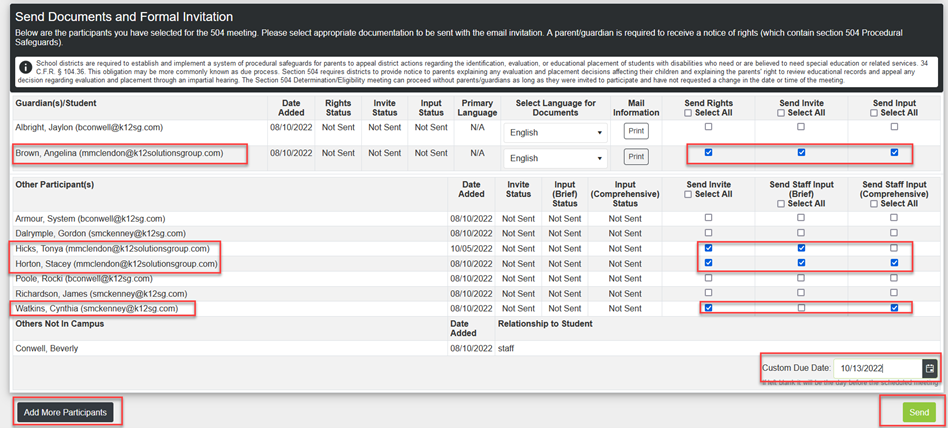
At any time after creating this meeting, before starting this meeting, when you click on the student’s status from the 504 Dashboard, you will be presented with the Meeting page. You are able to see all documents that have been sent, with the date and timestamp, and monitor who is planning to attend and who has completed documents.
Parent Input Forms (Eligibility)
When parents are emailed the forms to be signed electronically, they will receive an email with a link to access the documents. Note the due date in the parent’s email is based on the Custom Due Date entered when sending the documents.

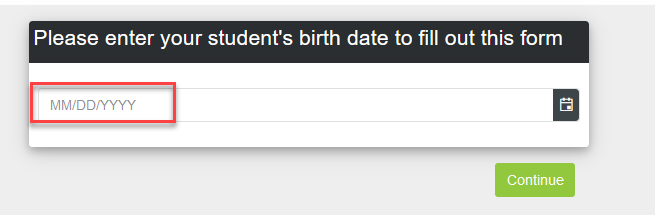
When the parent clicks on the link, they are presented with a screen to input the student’s date of birth.
Note: This is a security feature to ensure this is the correct person accessing the documents.
The parent will enter the students date of birth and click Continue.
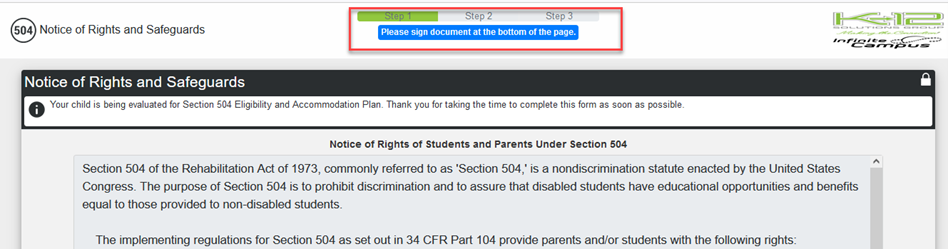
Parents are then presented with the electronic documents sent by the school.
Note: In our example we sent all three (3): Rights and Safeguards, Invite, and Input form.
The progress bar across the top shows the parent the number of documents needing signatures.

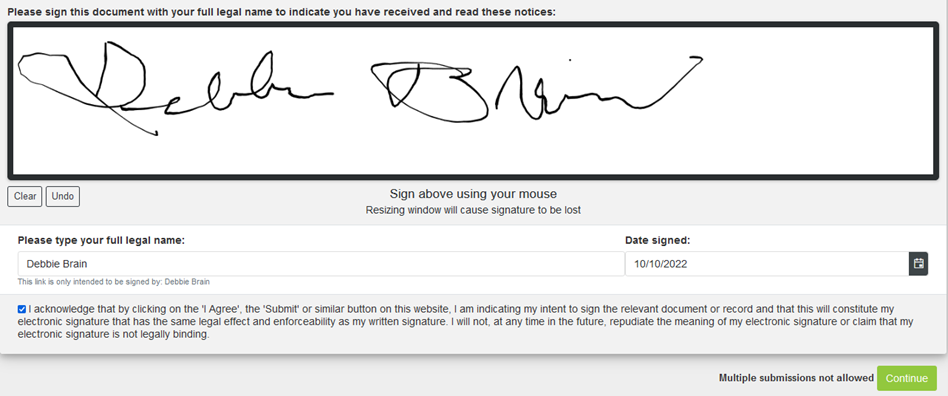
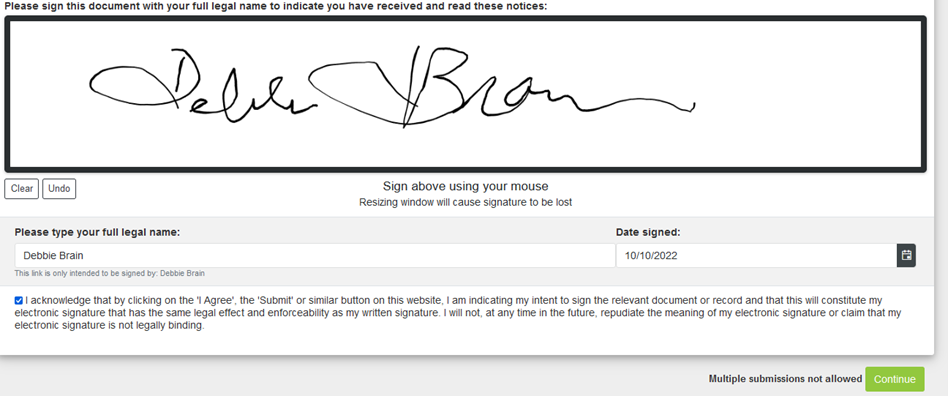
Each set of documents must be signed since they can be sent individually or all in one email. Parent must sign, type legal name, enter date and check box indicating they agree to this electronic document. Then click the Continue button.
The parent is then presented with the next document, Notice of Meeting (Invite). They must respond to the question of whether they plan to attend.
Options are:
- I plan to attend the 504 meeting
- I cannot attend the 504 meeting, please contact me to reschedule.
- I do not plan to attend the 504 meeting; please have the meeting without me. I understand I will receive communication and documentation for all decisions made.
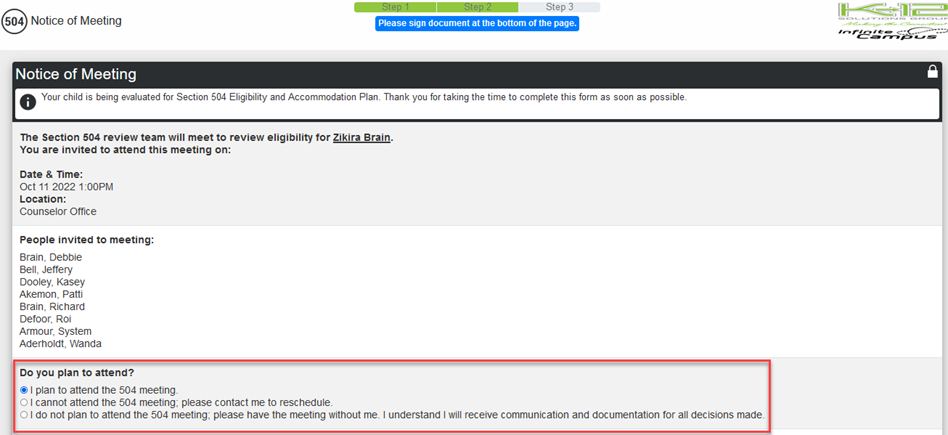
This document also requires a signature, typed name, date, check box, and Continue button.

The parent is then presented with the final document, Parent Input Form. They must respond to the question asked. If they do not have a response they may enter N/A.
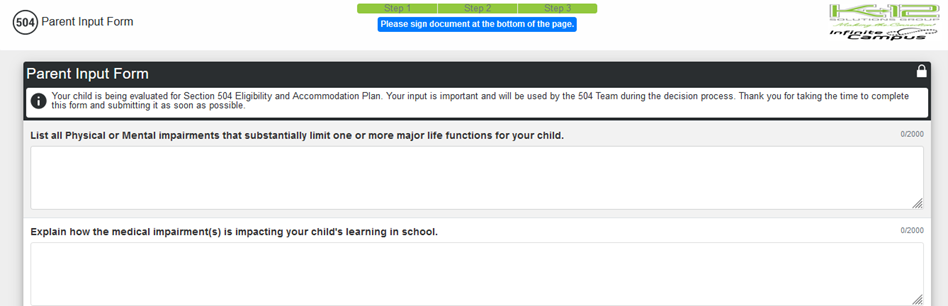
This document also requires a signature, typed name, date and check box. They will then the Continue button.
As with all Parent documents, the final page is a recap of all documents/forms parent has signed. They may use the Printer icon to print these documents as hard-copies or save them as PDF documents. They then may exit out of the document.
Teacher/Staff Input Forms (Eligibility)
When teachers or other staff are invited to an Eligibility meeting or sent input forms, they receive an email instructing them to log into Infinite Campus and go to the 504 Staff Dashboard. The email contains a due date based on what was entered in the Custom Due Date field.

Once logged into the Infinite Campus 504 Staff Dashboard, the student will be on the dashboard with a status of Input Required.

When the status is clicked, if the staff member was sent an invitation, it will appear along with any input forms that were sent.
Note: Invitation, Brief Staff Input, and Comprehensive Staff Input may each be sent independent of each other.
All questions must be answered before the system will allow the user to Save the input.
Once a teacher has completed the input requested, their dashboard will display the student’s status as Pending Decision.

Eligibility Meeting
Draft Meeting (Eligibility)
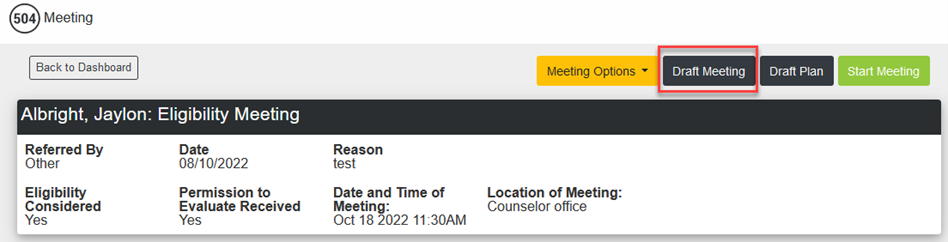
The 'Draft Meeting' button will allow you to prepare for the 504 Eligibility meeting prior to the start of the meeting. The Draft meeting option allows you to pre-select and document findings prior to the meeting, expediting the input of documentation during the meeting, allowing the facilitator to focus on the facilitation of the meeting and the input of meeting minutes. From the 504 Dashboard click on the student’s current status ‘Pending Eligibility Meeting’ to access this option.
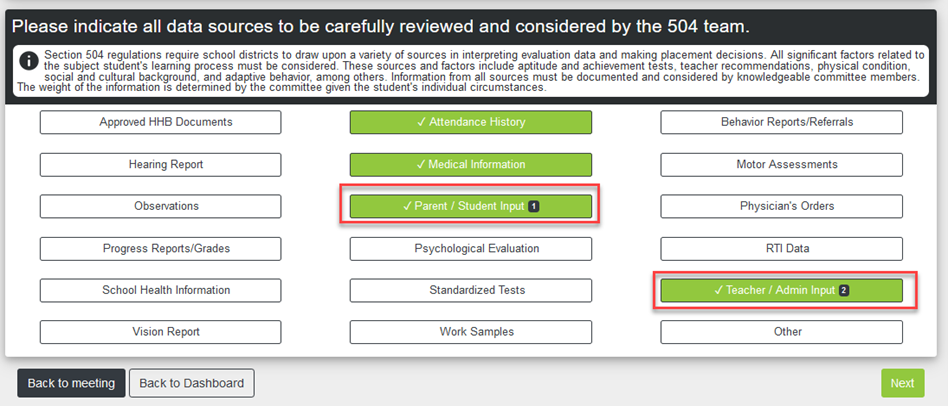
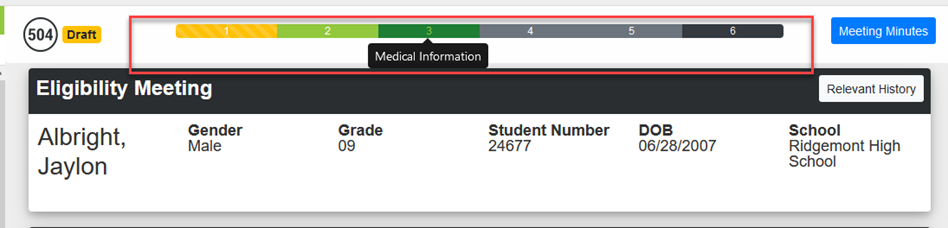
You are presented with a list of customized Data Sources to select from as those that will be reviewed and considered by the 504 team during the Eligibility meeting.
At least one data source must be selected. If a Parent/Student input is available, you will see a quantity indicator, and by hovering over this box it will show you the name of the Parent/Student that completed the form.
Same is true for the Teacher/Admin Input. To see the input from either of these they must be selected as a data source. Select the desired data sources and click Next to continue through the questions.
Note: The pages presented in this documentation are examples only and will change based on what data sources are selected.
Selected data sources control what questions are asked.
With this being a Draft meeting, you may click Back to meeting or Back to Dashboard at any time. The Next button acts as a Save, so the current page will not be saved if you go Back to meeting or Back to Dashboard. If you click Next without responding to required questions on the current page you will receive an error message.
When you click Next you will be presented with the Impairment detail page. The questions gather the information about the impairment and will always be presented first prior to any selected Data Source questions.
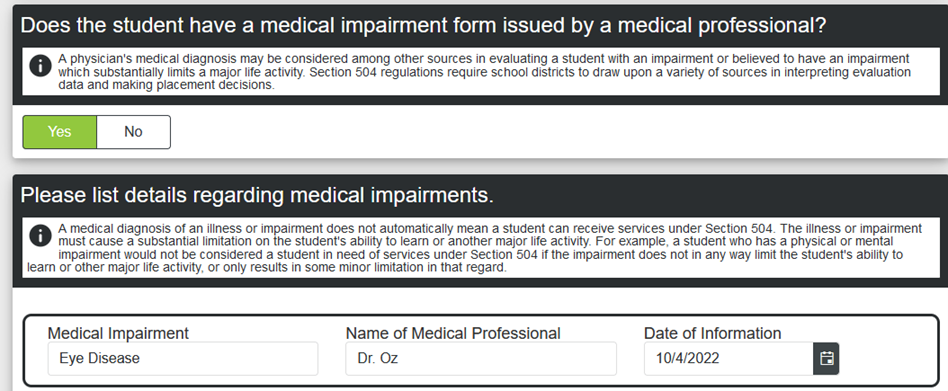
If you have one or more medical impairment form(s) issued by a doctor, the page allows you to document each of them individually. You will want to upload these documents into the allocated 504 documents section outside of this module. If you answer 'No' to this question, you are presented with a section to describe how the impairment impacts the student within the school setting.
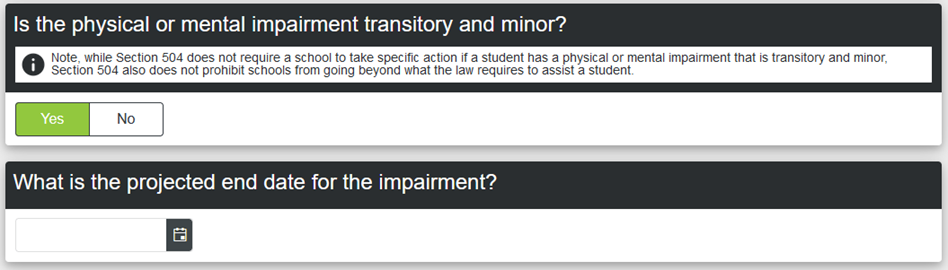
The last question on the Impairments details is whether the impairment is transitory and minor. If you answer ‘No’ you will click Next and continue to the series of Data Source questions. If you answer ‘Yes’ you must enter the projected end date for the impairment.
As you continue to click Next through the pages, the progress bar will display what step you are on. By hovering over the progress bar, you will see each selected Data Source. As you complete the questions for each Data Source it will turn green. If you add or remove a Data Source, the progress bar will reflect this change. You may return to the Draft Meeting as many times as needed, making changes along the way, up until you Start the Meeting.
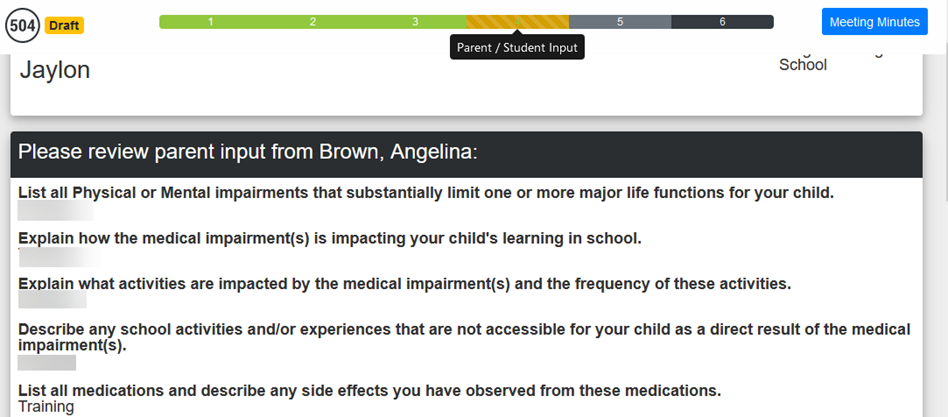
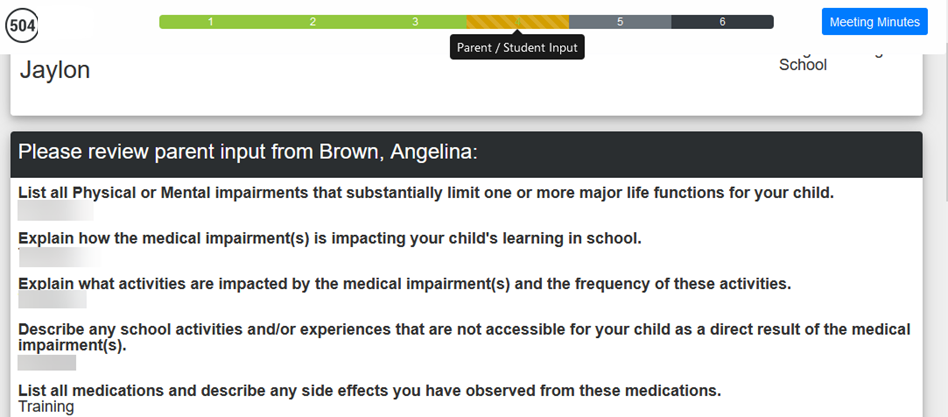
If you received Parent/Student Input and selected this as a Data Source, you will see the Input Form completed by the parent. There is a place for you to describe whether the parent’s input provided any relevance to the impairment.
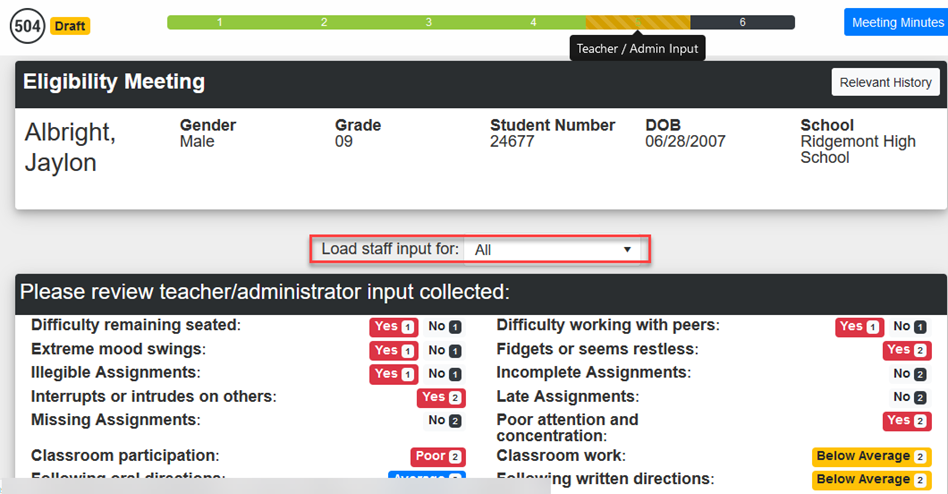
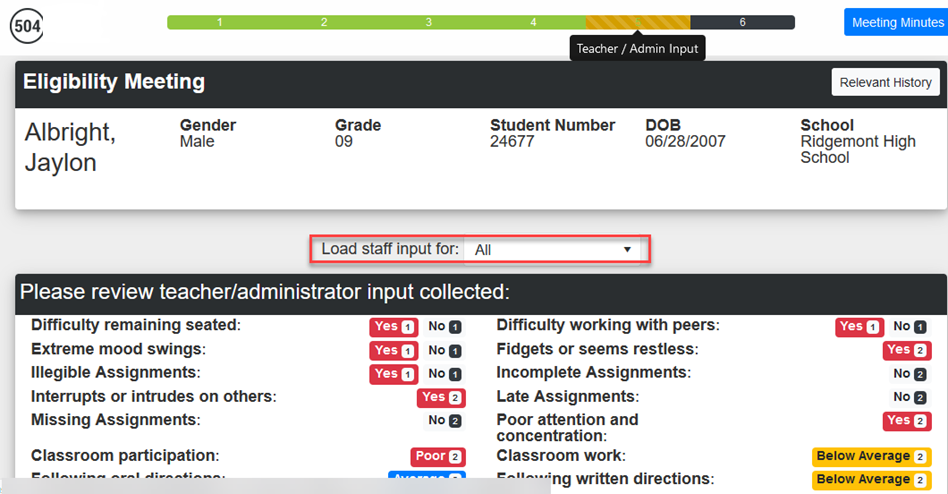
If you received input from Teachers/Admin and selected this as a Data Source, you will see a tally of all responses. You also have a way to select each individual response by using the ‘Load staff input’ drop list.
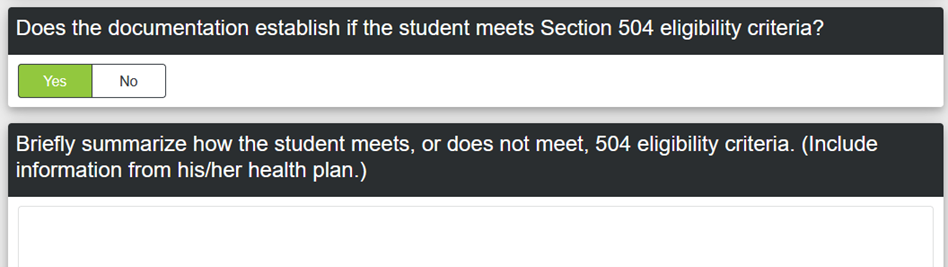
The final page is the decision portion of the Eligibility Meeting. These questions detail whether the documentation establishes that the student meets Section 504 eligibility criteria. You must respond with a ‘Yes’ to both of the first two questions in order to have the option of making this student 504 eligible.
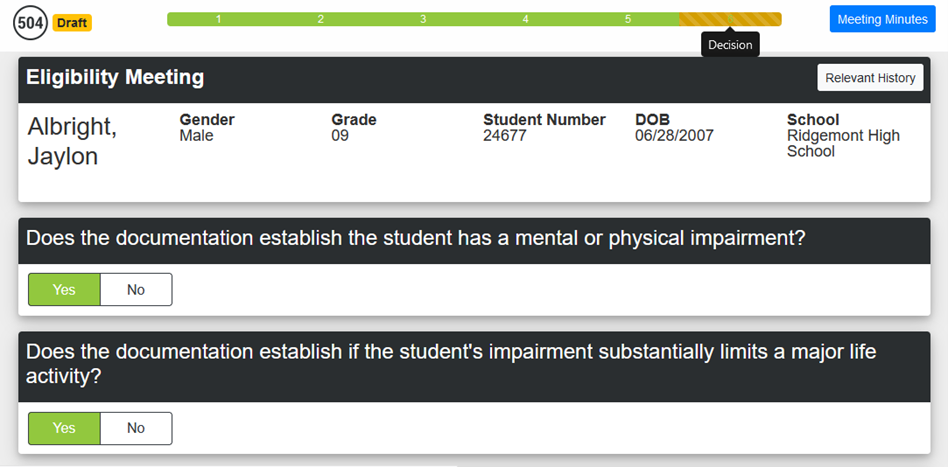
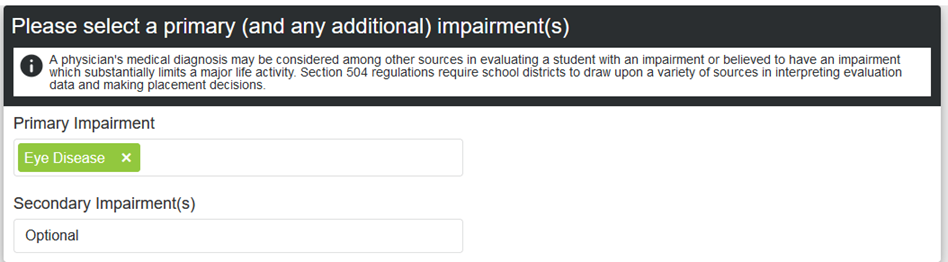
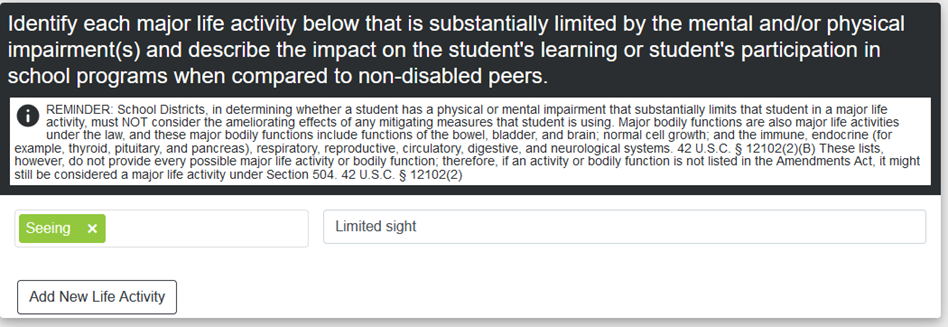
Their major life activity must be identified with a brief description. Multiple may be selected as needed.
You must briefly summarize your findings whether you answer ‘Yes’ or ‘No’ to whether the documentation establishes if the student meets Section 504 eligibility criteria. If you respond with a ‘Yes’ you must indicate whether the student needs Section 504 accommodations.

When you click Next you are returned to the Meeting page. You may return to the Draft Meeting at any time as new evidence is received or new input forms are completed. Any information entered on the Draft Meeting pages may be changed while in the Draft as well as during the actual meeting.
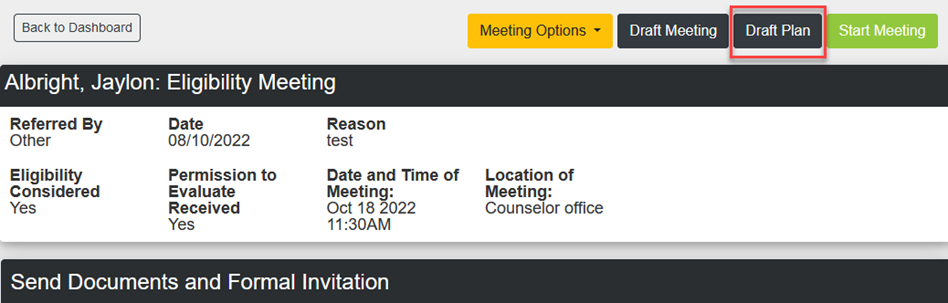
Draft Plan (Eligibility)
The 'Draft Plan' button will allow you to preselect the Classroom Accommodations and Testing Accommodations that will be presented during the Eligibility/Plan Meeting. Like the Draft Meeting button, this option expedites the data input during the meeting. From the Meeting page click on the Draft Plan button to access this option.
The Plan Start and End dates are pre-populated, based on the Eligibility date. These may be adjusted as needed.
Note: If you have customized your module to have data sources for the Plan, these will be presented prior to the screen on which you select the classroom and testing accommodations. As with the Draft meeting, data source selections control what questions are asked.
To add a Classroom Accommodation, click in the box and select from the custom list of classroom accommodations. Accommodations can be filtered by starting to type a word that is included in the accommodation or typing the Accommodation Type.
Next, a content area will be selected and any Additional Accommodation Details can be included to ensure a teacher properly provides each defined accommodation.
Additional accommodations may be added by clicking on the Add New Accommodation button.
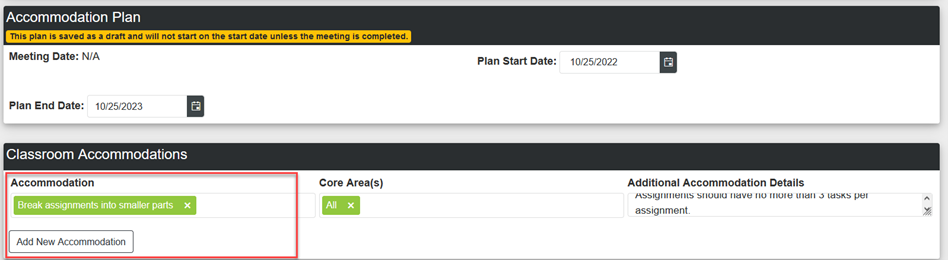
A complete list of Classroom Accommodations can be seen by clicking on the icon (highlighted in red below).
To add a Testing Accommodation, click in the box and select from the custom list of tests and then select from the list of custom accommodations. Accommodations can be filtered by starting to type a word in the search box that is included in the accommodation. Multiple accommodations may be selected per test. . Any comments related to the test accommodation(s) can be added in the Comments box. Use the Add New Test Accommodation button to add additional tests and accommodations.
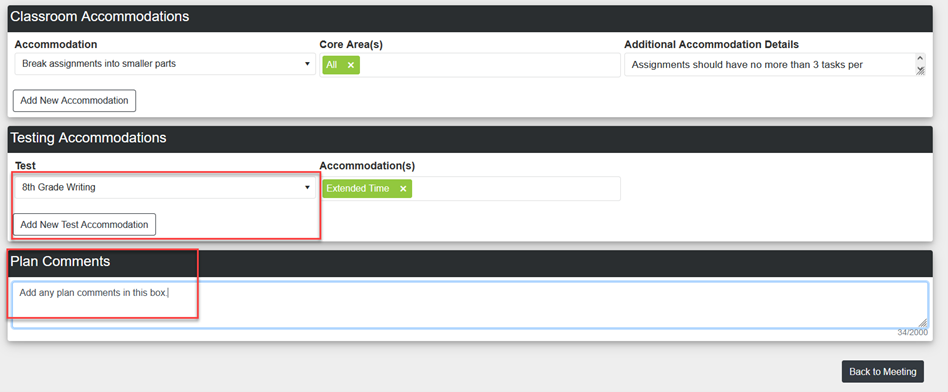
A complete list of Testing Accommodations can be seen by clicking on the icon (highlighted in red below).
Use the Plan Comments box to add any specific comments about the plan. Click the Back to Meeting button to return to the Meeting page.
The Print draft 504 Plan button on the Draft Plan page provides a way to communicate the suggested accommodations to the Eligibility Team prior to the meeting.

Start Meeting (Eligibility)
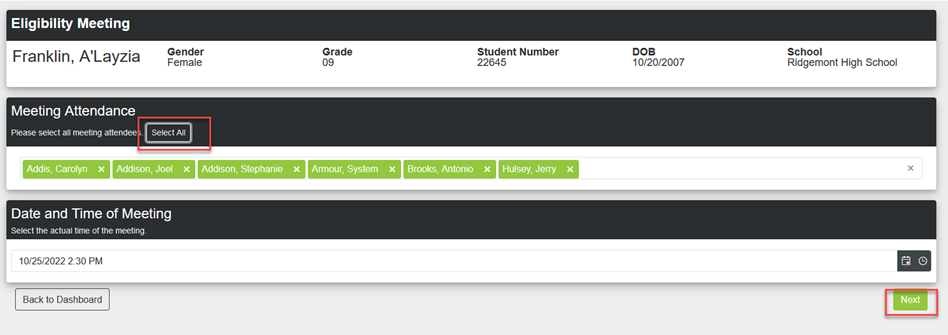
Once you are ready to start the meeting, click the 'Start Meeting' button in the top right corner of the Meeting page.

This will deactivate any links for guardians/staff and will bring you to the meeting information screen. The student’s status is changed to Pending Decision.
Select the Meeting Attendees using the Select All button to add all previously identified participants. If a guardian/staff confirmed their attendance, they will be pre-loaded as a meeting attendee. Be sure to include all participants in attendance, both physically and virtually.
Note: Only people identified as a meeting participant will be able to electronically sign meeting documents.
Meeting date and Time are preloaded, but may be adjusted as needed. Click Next.
If you created a Draft Meeting, the selections made within the draft are displayed. Data source selections may be changed at this time from what was originally selected within the draft and responses to all meeting questions entered within the draft may be changed as well.
At least one data source must be selected. If a Parent/Student input is available, you will see a quantity indicator, and by hovering over this box it will show you the name of the Parent/Student that completed the form. Same is true for the Teacher/Admin Input. To see the input from either of these they must be selected as a data source. Select the desired data sources and click Next to continue through the questions.
Note: The pages presented in this documentation are examples only and will change based on what data sources are selected.

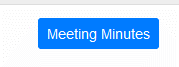
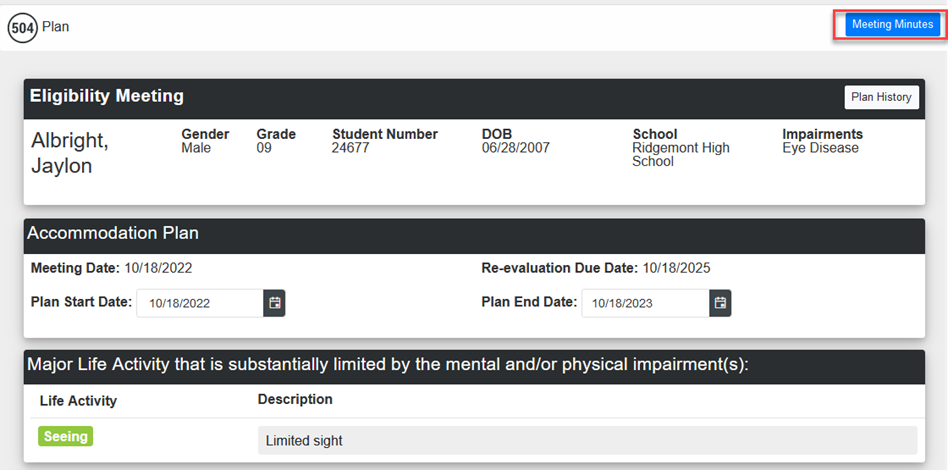
Meeting minutes can be accessed at any time during the meeting by clicking the blue "Meeting Minutes" button in the top right of the screen.
The Next button acts as a Save, so the current page will not be saved if you go Back to meeting or Back to Dashboard. If you click Next without responding to required questions on the current page you will receive an error message.

When you click Next you will be presented with the Impairment detail page. The questions gather the information about the impairment and will always be presented first prior to any selected Data Source questions.
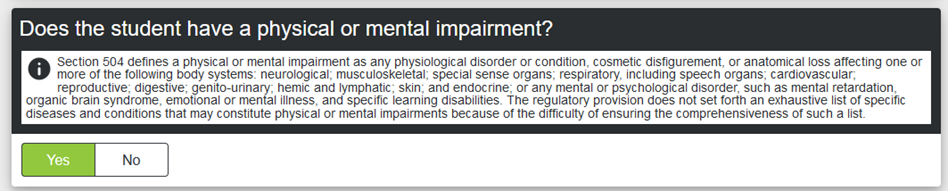
If you have one or more medical impairment form(s) issued by a doctor, the page allows you to document each of them individually. You will want to upload these documents into the allocated 504 documents section outside of this module. If you answer No to this question you are presented with a section to describe how the impairment impacts the student within the school setting.

The last question on the Impairments details is whether the impairment is transitory and minor. If you answer ‘No’ you will click Next and continue to the series of Data Source questions. If you answer ‘Yes’ you must enter the projected end date for the impairment.

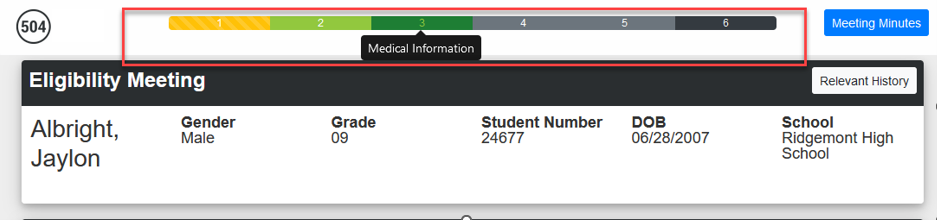
As you continue to click Next through the pages, the progress bar will display what step you are on.
Users can move between steps using the Progress bar of by clicking the ‘Next’ button at the bottom of the page.
By hovering over the progress bar, you will see each selected Data Source. The yellow steps shows the user where they are in the progress.
The green steps shows the user the steps that are completed. The grey steps shows the user steps that are uncompleted.
If you add or remove a Data Source, the progress bar will reflect this change.
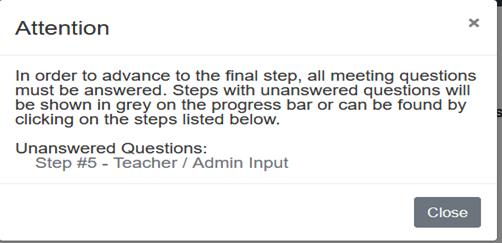
Users will not be allowed to click on the final step if required questions have not been answered during a meeting.
Click on the step on the progress bar or use the link in the warning message to go to the steps with unanswered questions.
If you received Parent/Student Input and selected this as a Data Source, you will see the Input Form completed by the parent. There is a place for you to describe whether the parent’s input provided any relevance to the impairment.
If you received input from Teachers/Admin and selected this as a Data Source, you will see a tally of all responses. You also have a way to select each individual response by using the ‘Load staff input’ drop list.
The final page is the decision portion of the Eligibility Meeting. You must complete all questions before going to this page. These questions detail whether the documentation establishes that the student meets Section 504 eligibility criteria. You must respond with a ‘Yes’ to both of the first two questions in order to have the option of making this student 504 eligible.
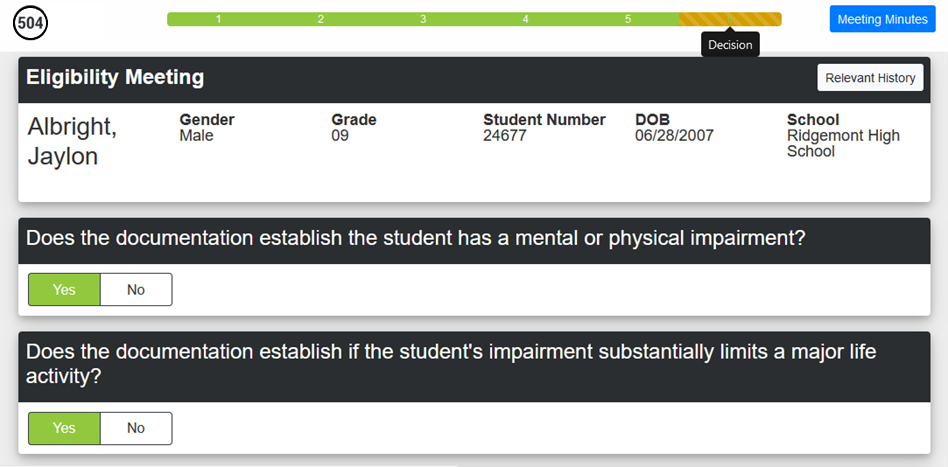
Their major life activity must be identified with a brief description. Multiple may be selected as needed.

You must briefly summarize your findings whether you answer ‘Yes’ or ‘No’ to whether the documentation establishes if the student meets Section 504 eligibility criteria. If you respond with a ‘Yes’ you must indicate whether the student needs Section 504 accommodations.


If the student is found eligible for 504, a flag will be added to the student in Campus (if flag set in 504 Settings) after clicking "Finalize & Start Plan".
Note: This screen is dynamically generated based on the questions answered, and may have different wording than displayed above.
Be sure to type any Meeting Minutes in the text box. Closing the Meeting Minutes screen automatically saves any minutes entered.
If Meeting Minutes are set as required in 504 Settings with a character limit, an error will be displayed and you will not be able to continue to the Plan
portion of the meeting without satisfying requirement defined in Settings.
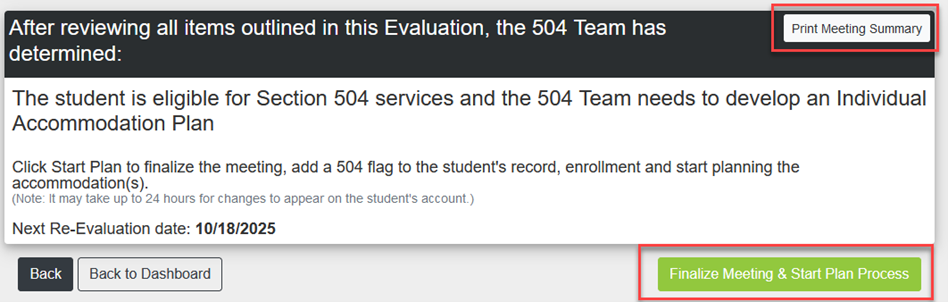
The Print Meeting Summary button allows user to print Eligibility responses for this meeting.
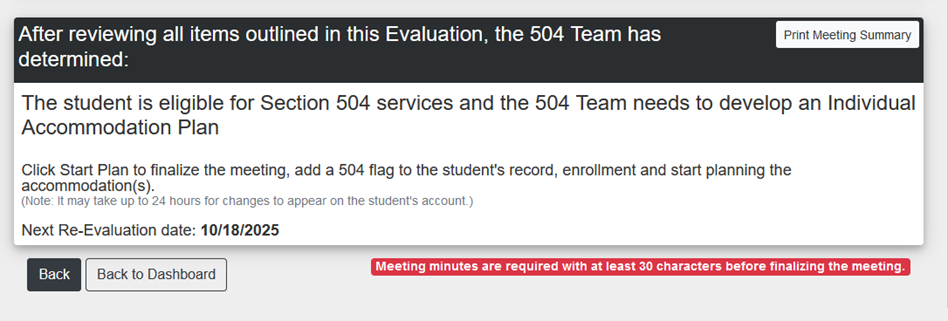
Once minute requirements have been satisfied, the Finalize Meeting & Start Plan Process button will appear.
The Print Meeting Summary button allows user to print Eligibility responses for this meeting.
Accommodation Plan Process
After clicking the Finalize meeting & Start Plan Process button the screens to develop the Accommodation Plan will display.
The Plan Start Date and Plan End Date are pre-populated based on the Meeting Date. These may be edited as needed.

The student’s Major Life Activity defined during the Eligibility Meeting portion will be displayed, but may not be edited here. The Meeting Minutes button is available on all screens and continues from the Eligibility Meeting portion.
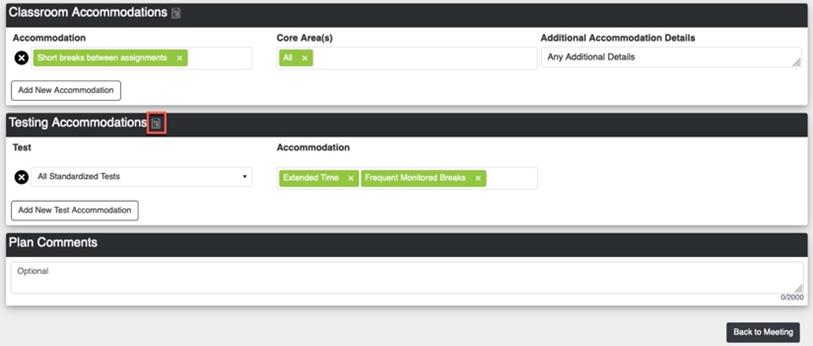
If a Draft Plan was developed, the Classroom Accommodations and Testing Accommodations defined in the draft will be shown. These may be edited or removed as needed.
To add a Classroom Accommodation, click in the box and select from the custom list of classroom accommodations. Accommodations can be filtered by starting to type a word that is included in the accommodation or typing the Accommodation Type.
Next, a content area will be selected and any Additional Accommodation Details can be included to ensure a teacher properly provides each defined accommodation.
Additional accommodations may be added by clicking on the Add New Accommodation button.
NOTE: All changes are auto-saved.
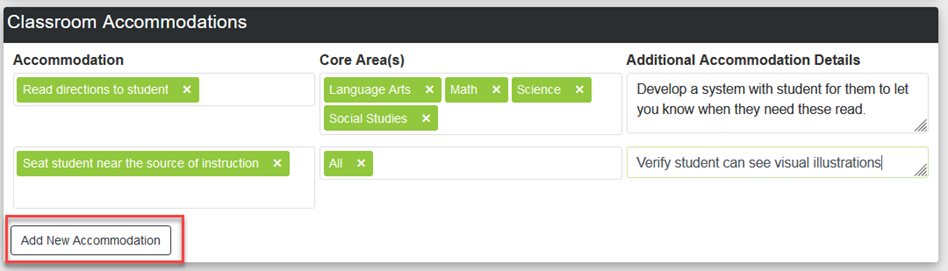
A complete list of Classroom Accommodations can be seen by clicking on the icon (highlighted in red below).

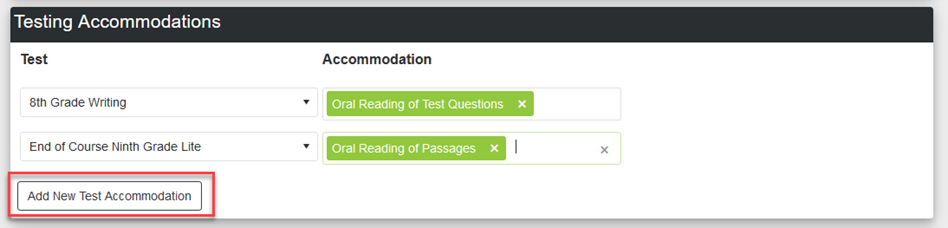
To add a Testing Accommodation, click in the box and select from the custom list of tests and then select from the list of custom accommodations.
Accommodations can be filtered by starting to type a word in the search box that is included in the accommodation. Multiple accommodations may be selected per test.
Any comments related to the test accommodation(s) can be added in the Comments box. Use the Add New Test Accommodation button to add additional tests and accommodations.
NOTE: Test accommodations do NOT update the testing accommodations tab in Campus.
A complete list of Testing Accommodations can be seen by clicking on the icon (highlighted in red below).

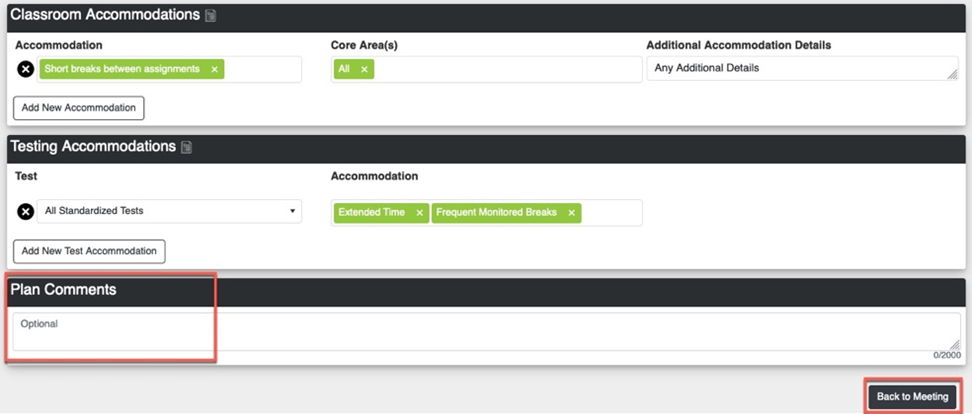
To enter any additional Plan Comments, use the text box. The comments can contain up to 2000 characters.

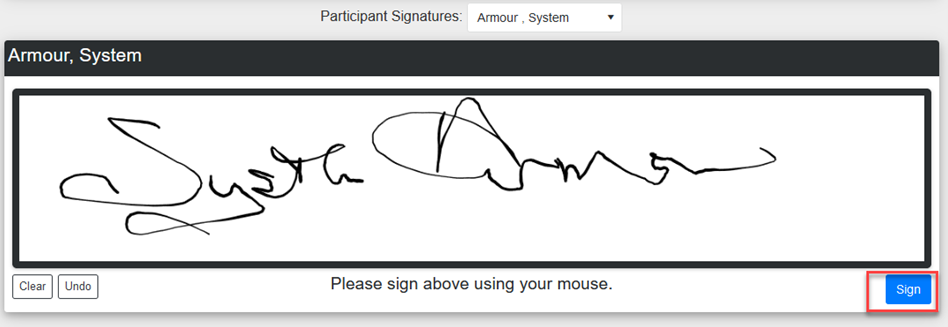
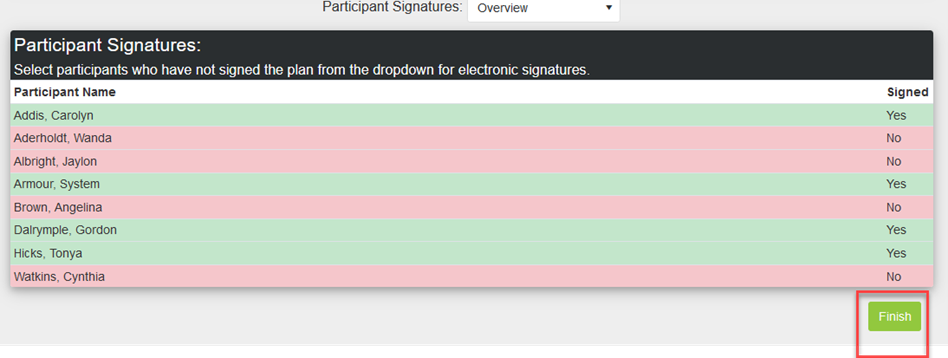
Participants that are physically present at the meeting will sign the meeting documents one at a time,
by selecting the participant name in the drop list, and having the participant sign electronically using the mouse.
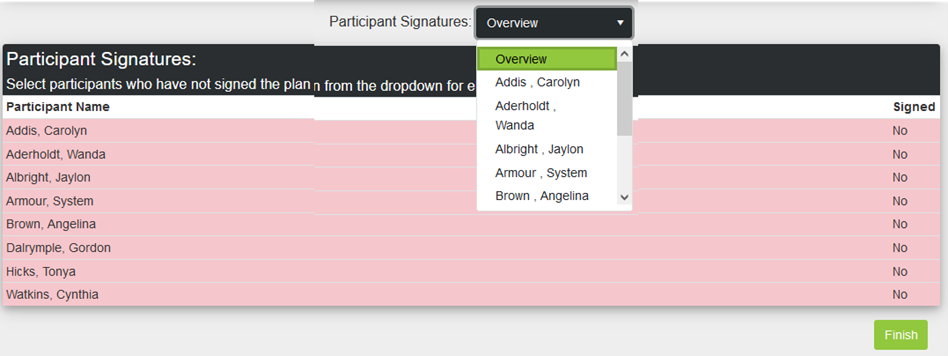
Participant will click the Sign button after signing their name.
Repeat this process for each meeting participant. Click "Finish" to finalize the Accommodation Plan.
When the Plan is finished, the system will take you to the Plan Overview page where you can see the Impairments, Major Life Activity, Classroom and Testing Accommodations, Plan Comments and a list of all Current Teachers and see whether they have signed electronically agreeing to implement the 504 plan.
Note: This is also the landing page from the 504 Dashboard when you click on a student that has been determined 504 Eligible.
Participants Signing as Virtual Attendees
Staff members marked as a meeting attendee when starting the meeting, have the ability to sign the meeting documents virtually using the custom 504 Meeting tab.
Note: Tool rights required for this tab.
Staff member must go to Student Information > General > 504 Meeting tab and select a student.

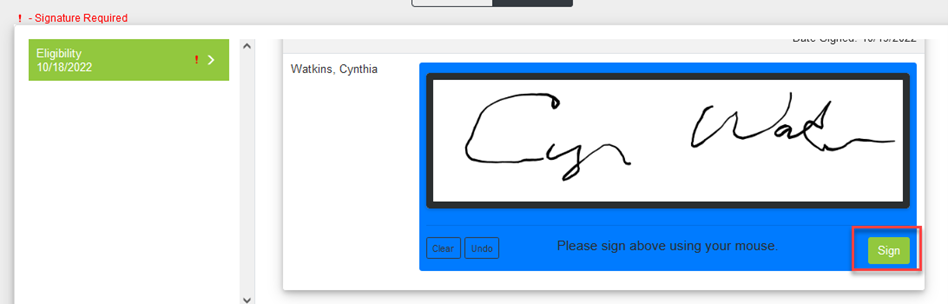
Until the participant has signed the meeting documents, the screen will display a message that a signature is required.
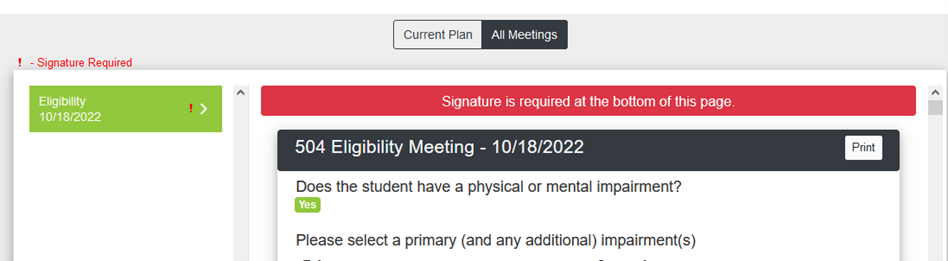
The user must scroll down to the bottom and find their name to sign electronically. Once they have signed they must click the Sign button. Notice that all questions and responses documented during the meeting, as well as parent input, staff input, meeting minutes, all accommodations, and comments captured during the meeting are part of this meeting document. The Print button will allow the user to print as needed.
Parent Portal
The 504 Meeting button can be turned on for the Parent Portal by going to
System Settings > Custom Data and Links > Custom Tool Setup > select 504 Meeting in the Tool Name column > check the 'Publish to Portal' checkbox > Save.
From the Parent Portal a parent must select the More button within the left black ribbon of options. This will display a list of folders, one of which is 504 Meeting.
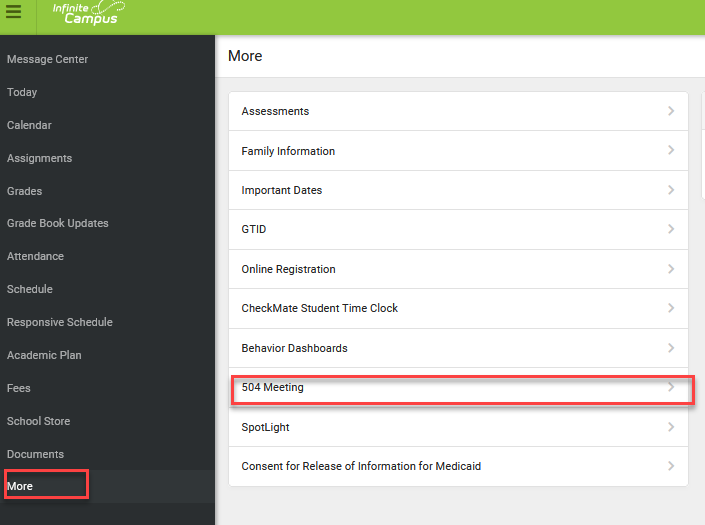
A student must be selected using the drop list displayed.


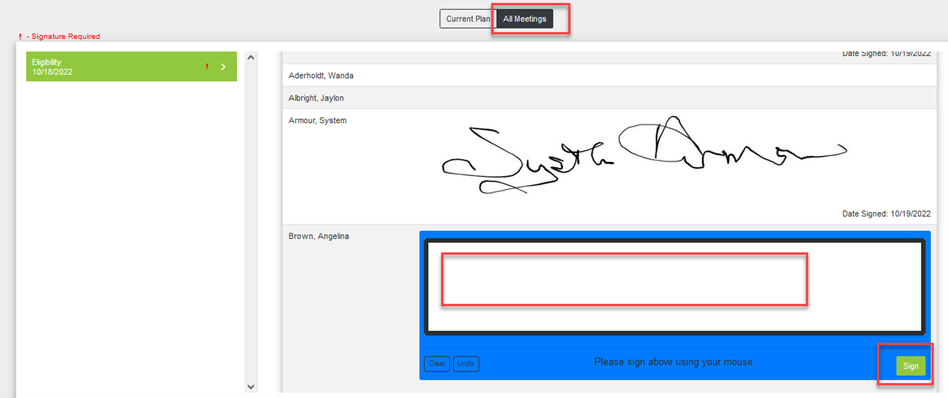
The Current Plan will be displayed.
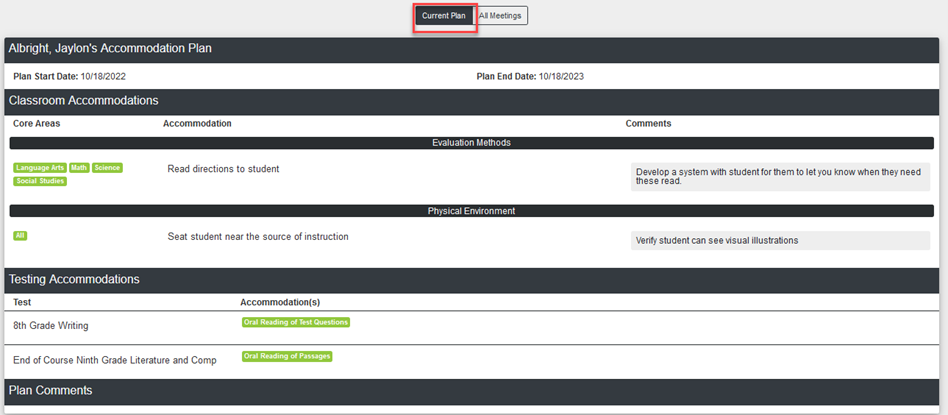
The All Meetings tab may be selected to see the details of all Meetings. A Print button is available for the selected meeting, and a Print All button is available for parent to print details of all meetings.
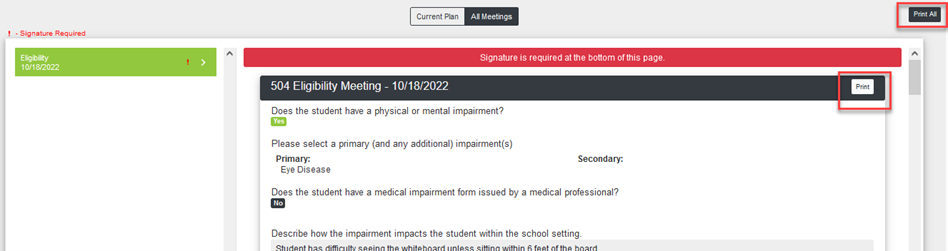
If a signature is outstanding from a meeting in which the parent was an attendee, it will indicate that a Signature is required. They may scroll down and find a place for an electronic signature, then click Sign.
Reschedule Meeting
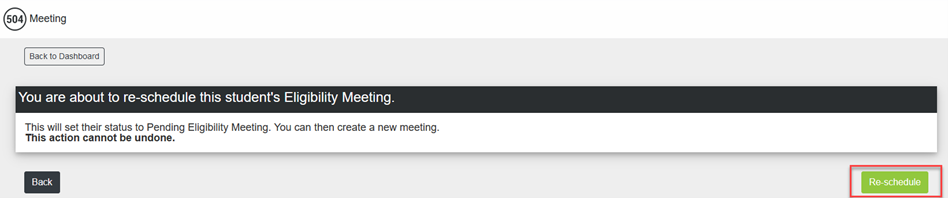
Meetings can also be rescheduled by clicking "Re-Schedule Meeting". This will deactivate any links already sent and will allow you to create a new meeting.

Click "Re-schedule" on the next screen to reschedule the meeting. You are then presented with the Create a Meeting screen again, to enter the meeting date, time, location and again identify the participants. Any parent and/or staff input forms already completed by previously invited participants, will still be available if that person is included in this new meeting. Any other documents will need to be sent again.
Cancel Meeting
Meetings can also be cancelled by clicking 'Cancel Meeting'. This will deactivate any links already sent and will add the student back to the 504 Dashboard in his/her previous status. Enter the reason for cancellation and then select to send an electronic cancellation notice if needed. Click 'Cancel Meeting'.

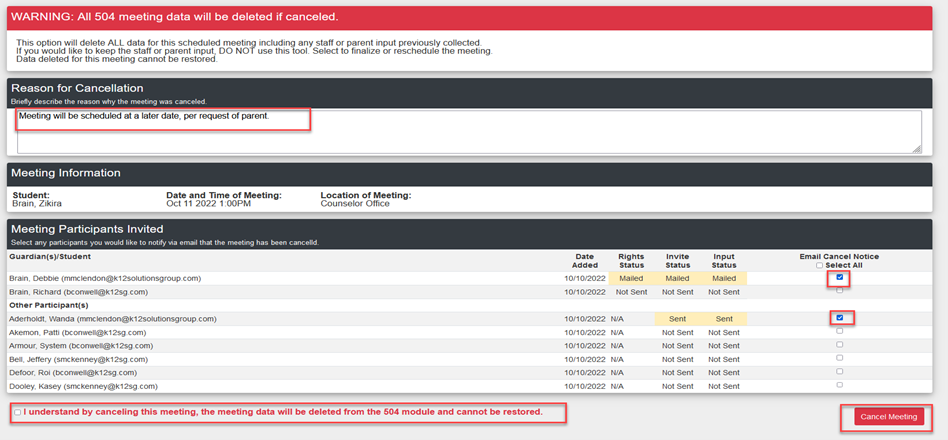
Canceled Meeting information may be viewed from the 504 History button.


By Email:
By Phone: (706) 520-1125
A representative from our support team will respond to you as soon as possible.